Reveal paragraph with highlighted text on scroll, using scroll trigger - with and without splitText plugin
In this tutorial, we will create an animation that reveals a paragraph with highlighted text on scroll, utilising the Scroll Trigger plugin, with and without the splitText plugin.
First, let’s take a look at the animation we’ll be creating:
See the Pen Text enablinging and highlight on scrolltrigger: splittext plugin by trapti (@tripti1410) on CodePen.
Setup
To begin, create a paragraph inside a wrapper. We won’t cover the basic styling here, but it’s essential to make the design look appealing. If styling is required for the animation, it will be mentioned later.
<div class="wrapper">
	<p>
		Lorem ipsum, dolor sit amet consectetur adipisicing elit. Distinctio
		debitis, delectus assumenda temporibus exercitationem qui aperiam
		consectetur nobis ullam molestias asperiores in vel. Asperiores numquam quam
		id. Et, cumque dolore.
	</p>
</div>
Since we need to animate each word individually, we’ll wrap each word in an HTML element. This allows us to target each word separately.
This can be achieved in two ways:
- Manually writing HTML where each word is wrapped in an HTML and styled in such a way that it look and behave seamless like a paragraph text.
- Using the splitText plugin. Here in HTML will just add a paragraph to
ptag. InJS will write splitText plugin’s code. And this will create a wrapper for each word insideptag.
We’ll start by using the splitText plugin.
After adding the splitText plugin CDN to your project, you can use it as follows:
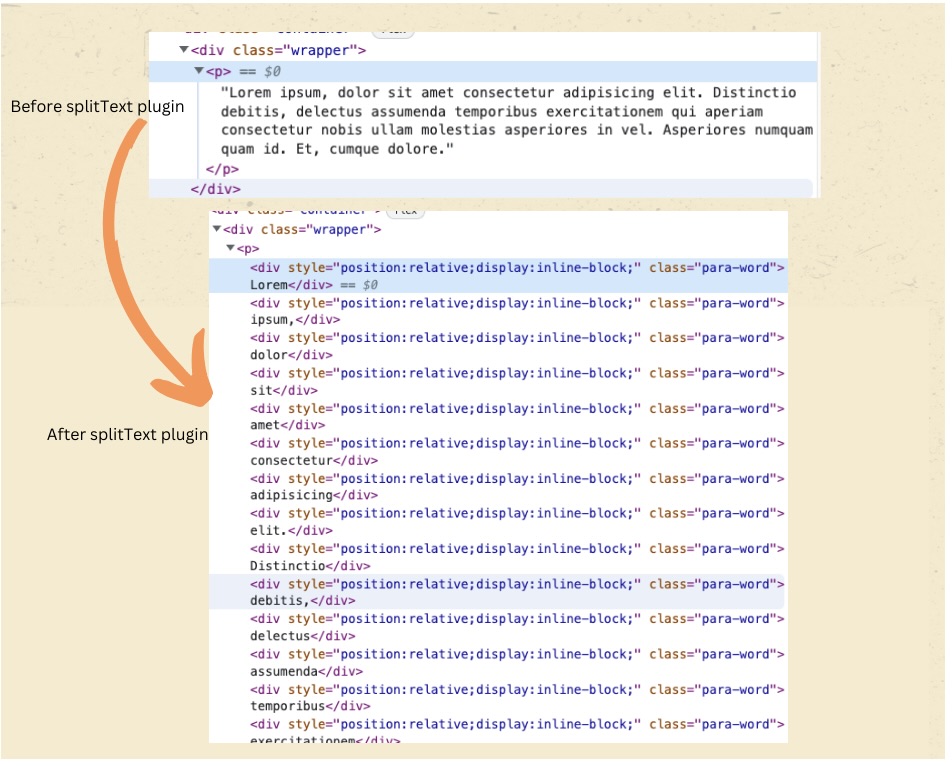
let paraTexts = new SplitText("p", { type: "words", wordsClass: "para-word" });This code wraps each word in the paragraph and applies a class to each word shown in the below image. And we can access words by accessing paraTexts.words.

Implementing ScrollTrigger
Now, let’s reveal these words on scroll using ScrollTrigger. Add the ScrollTrigger CDN to your CodePen project and set up a basic configuration:
let tl = gsap.timeline({
	scrollTrigger: {
		trigger: ".wrapper",
		pin: true,
		scrub: true,
		markers: true,
	},
});
Here’s a breakdown of the configuration:
trigger: The trigger element is the wrapper.pin: This pins the section while the text animation occurs.scrub: Animation runs as you scroll.markers: Adds markers to visualize triggers.
Next, add the animation to fade in the text word by word:
tl.from(paraTexts.words, { opacity: 0.5, stagger: 0.1 });This code animates each word with opacity 0.5 to 1. 0.5 will fade in and 1 will fade out. Stagger 0.1 will help word animate one by one after 0.1 seconds.
Here is live version for the above:
See the Pen text reveal word by word using scrollTrigger & splitText plugin by trapti (@tripti1410) on CodePen.
Adding Highlights
Now, let’s add highlights to 2 words in the paragraph. Highlights are background colors that animate from left to right, covering the entire word from behind. To achieve this I am going to add class highlight-1 and highlight-2 at the index 5 and 13 to target 6t and 14th word in the paragraph.
Here’s how to add a highlight class to specific words using plain Javascript:
paraTexts.words[5].classList.add("highlight-1");
paraTexts.words[13].classList.add("highlight-2");
In your CSS, create different class names (.highlight-1 and .highlight-2) for each highlight or target them separately to avoid running both highlights simultaneously. Use the following styles to create the green background for the highlighted words:
.highlight-2,
.highlight-1 {
	position: relative;
}
.highlight-2::after,
.highlight-1::after {
  content: "";
  width: 100%;
  background-color: green;
  position: absolute;
  top: 6px;
  left: 0px;
  height: 35px;
  z-index: -1;
}
To animate the highlights, use scaleX to go from 0 to 100 with transformOrigin: 0% 0%. we will target pseudo-elements using GSAP’s CSSRulePlugin.
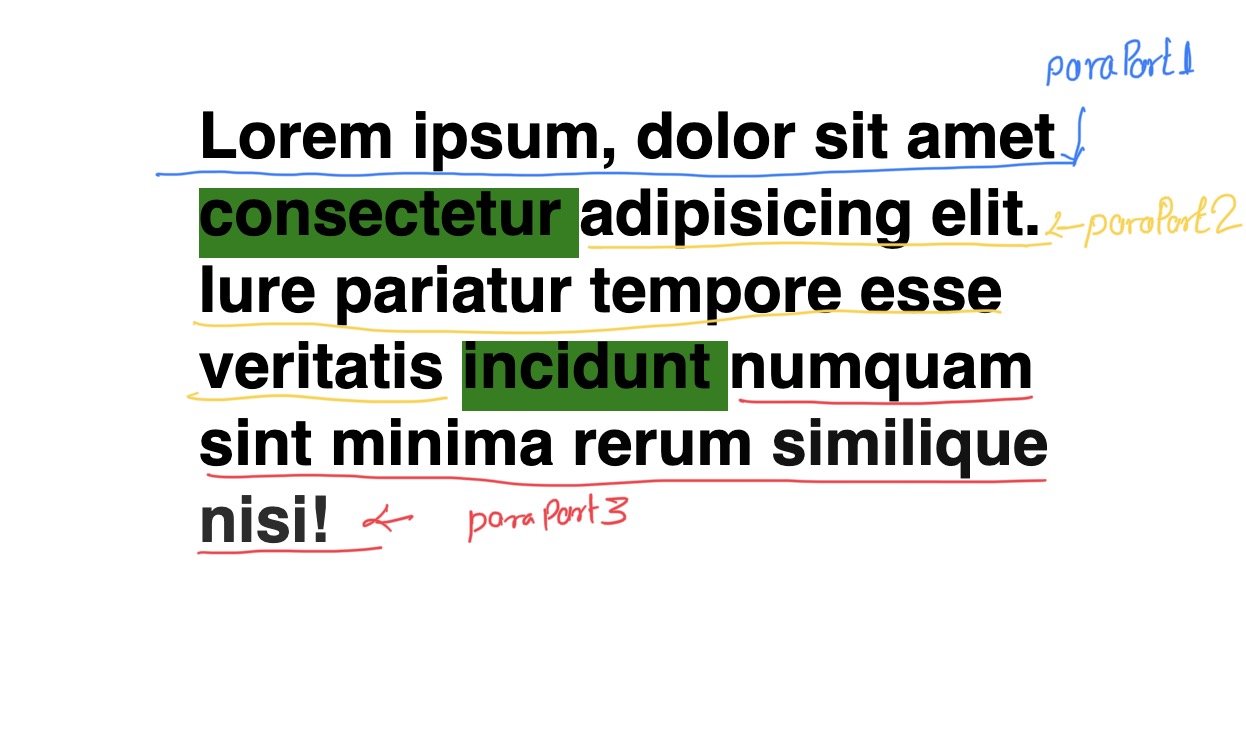
Now we have highlights to animate, and the highlighted word and other words around that. It should look seamless, as if the paragraph is revealing from top to bottom. Wherever the highlighted word is, it should also get highlighted with the text reveal. For this, we need to divide all the words in the paragraph into three parts:
- Words before the first highlight(calling it paraPart1)
- Words after the first highlight and before the second highlight ( calling it paraPart2)
- Words after the second highlight (calling it paraPart3)
This division will help us achieve the desired effect, as shown below in the image.

Finally, arrange all the tweens(paraPart1, highlight-1 paraPart2, highlight-2, paraPart-3) in a timeline:
tl.from(spanPart1, { opacity: 0.5, stagger: 0.1 })
	.from(".highlight-1", { opacity: 0.5, duration: 0.1 })
	.from(
		CSSRulePlugin.getRule(".highlight-1:after"),
		{ cssRule: { scaleX: 0, transformOrigin: "0% 0%" }, duration: 0.2 },
		"<"
	)
	.from(spanPart2, { opacity: 0.5, stagger: 0.1 })
	.from(".highlight-2", { opacity: 0.5, duration: 0.1 })
	.from(
		CSSRulePlugin.getRule(".highlight-2:after"),
		{ cssRule: { scaleX: 0, transformOrigin: "0% 0%" }, duration: 0.2 },
		"<"
	)
	.from(spanPart3, { opacity: 0.5, stagger: 0.1 });
You’ve now completed the animation. Here’s the final result:
See the Pen Text enablinging and highlight on scrolltrigger: splittext plugin by trapti (@tripti1410) on CodePen.
Without Using splitText
For this approach, we’ll manually write all the HTML instead of generating it with the splitText plugin. To select all the words in an array, you can use querySelectorAll() or GSAP’s utility function .toArray. The rest of the process remains the same.
Here’s the CodePen link for this version:
See the Pen Text enablinging and highlight on scrolltrigger by trapti (@tripti1410) on CodePen.
The Difference
The key difference between the two approaches lies in how the HTML elements are generated and targeted. The splitText plugin automates the process, making it more efficient and convenient. However, when manually creating elements, you have more control over customisation but may require additional effort. Choose the method that best suits your project’s needs.
I personally prefer the splitText plugin approach for several reasons:
- Simplicity and Efficiency: With splitText, we eliminate the need to manually create and style HTML elements for each word, making the setup cleaner and more efficient. This is especially beneficial when dealing with different devices and screen sizes.
- Easy Revert: If we ever need to revert the animation or make changes to it, the splitText approach allows for quick modifications without the hassle of rearranging HTML elements.
- Flexibility for Future Enhancements: SplitText provides flexibility for future enhancements. For instance, if we decide to change the animation to reveal characters or lines instead of words, the transition is straightforward with the plugin.
- Responsiveness: SplitText handles text responsiveness seamlessly. It adapts well to varying text lengths and screen sizes, ensuring a consistent and polished look.
- Ease of Management: When implementing similar text effects across multiple sections or pages on a website, managing them becomes much easier with the splitText approach. It centralizes the animation logic and simplifies updates or maintenance tasks.